Saturday, March 14, 2009

Lets begin!

I constructed this tutorial for those of you with GTX 200 Series graphics cards that want to replace the TIM (Thermal Interface Materials) or in lemans terms, thermal compound.
This walk through is mainly focused on the GTX 295 card. I will be showing how to remove the graphic card cover, removing both GPU’S from the heat sink, cleaning of the GPU’s and the GPU heat sink, re-applying TIM (Thermal compound) to the GPU’s, re-assembling the GPU’s back onto the heat sink, and lastly re assembling the GPU card cover.

*NOTE*. Taking apart the BFG tech model VOIDS ALL WARRANTY. Taking apart the EVGA model however does not void warranty.

I have provided detailed pictures that will guide you through this process.

The card that I have at my disposal is a BFG tech GTX 295. As you can see below it is ready and waiting to be dissected.

Photobucket


Tools needed:

1. TIM/Thermal compound (I used MX-2)
2. Paper tower/terry cloth (to whip off excess TIM)
3. Two sized phillips star head screw drivers,
4. 100% Isopropynol (for cleaning contact surfaces)
5. Needle nose pliars (for unmounting the rear dvi/slot shield)

Getting started!

Step 1. Disconnect the GPU from your system, make sure all power is turned off before removing it from your motherboard.

Step 2. If you have a clean flat surface like a desk to work on, I suggest that oppose to working somewhere cluttered. Place something under the card that wont cause an electro magnetic shock, like the shield pack packaging your GPU was shipped in. Now place your card upside down so you can see the PCB side of the card with all the screws.

Step 3. I have highlighted all the screws that need to come off, you may unscrew the circled areas in a criss-cross pattern or start from one end and finish at the other. There are a total of 20 screws that need to come off. There is one small screw hidden behind the bar code sticker, so you may peel off a section to uncover the screw. Once you have taken off all the screws, place them aside somewhere safe. These screws feature a spring tension mechanism and are easy to pop off so try not to lose them.

Photobucket


Step 4. Get your needle nose pliers and slightly twist the double sided screw/nut, that holds the exhaust shield on. It only takes a slight turn for these to come loose. Once that is done you can unscrew them with your fingers. There is a total of four that need to come off. There are also two screws that sit above the DVI ports that need to come off. Once these are off, slightly bend the exhaust shield backwards from the bottom out, it will become free from the DVI connectors. Don’t bend them too much just enough to make it clear the DVI connections.

Photobucket

Step 5. Once the exhaust shield is freed, you can now proceed to take off the top GPU card. It may take a little wiggle, hold the bottom with one hand and with the other pull up the top card. It may seem stuck but its not, the thermal paste acts almost like glue. Once you have successfully removed the top card, disconnect the internal Sli cable that is attached to it.

Photobucket

Photobucket


What a mess!

You can take a look at how the TIM was just gooped on there. Very sloppy job, It's enough to cover 2-3 cards...literally. You can put the card aside for now. Next is onto the removal of the second GPU.

Step 6. The GTX shroud cover that covers the entire card needs to be unscrewed. Get your Phillips star, and unscrew the three on the back side, and the one on the front left. As shown below. Now, here is the tricky part. There are two screw’s behind the BFG tech GTX 295 sticker, this you MUST be very careful with, you are going need this off. Carefully peel one side, make sure the sticker isn’t ripping. For the most part, these stickers aren’t stuck on so it is fairly easy to come off. Once its off place it aside. Remove the two screws that were uncovered.

Photobucket

Photobucket

Step 7. Holding the uncovered portion of the heat sink, firmly grip the shroud and pull down. It should now be off and look like this.

Photobucket

Photobucket

Step 8. With the bottom card uncovered I have highlighted the screws that need to come off, my apologies for the horrible picture it's blurry but you can still see what needs to come off. Put these screws separate from the top cards screw’s.

Photobucket

Step 9. You should now be able to pull apart the bottom GPU card from the heat sink.

Photobucket

Step 10. Get your paper towel or terry cloth and begin to clean off all the excess TIM from both GPU’s and both sides of the heat sink.

Photobucket

Photobucket

Step 11. Once all the TIM has been removed, get your isopropynol and dab some on a piece of clean paper towel or terry cloth. Begin to clean the GPU surface until it looks new. Do the same on the copper portion of the heat sink.

Photobucket

Step 12. Now that all surfaces are cleaned you can go ahead and get the TIM of your choice. I am old fashioned and I prefer to evenly spread the TIM before I replace the heat sink. Some prefer to do the rice grain sized blob in the center. I did it my way, which is applying two lines diagonally or vertically across the GPU one in the center and the other on the end. I then get an old business card, or plastic card that I am not using and EVENLY spread a thin layer across the GPU, and it looks like this.

Photobucket

Almost there!

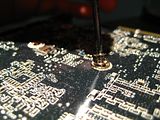
Please remember to ensure that the white thermal pads that are stuck on the heat sink for the RAM chips, are intact in their designated areas before you replace the heat sink. Some people remove these pads and put non-conductive thermal paste, but these pads are suffice for heat dissipation.

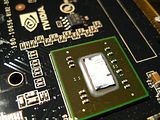
There are three small die chips in total on both boards combined. The only one that I replaced the TIM for was the one that mates with the small copper portion of the heat sink on the top card.

Photobucket

Photobucket


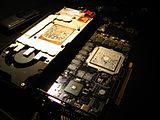
Step 13. You can now start to re-assemble the GTX 295. Starting with the bottom GPU first, if you are confused it is the one that has the little rubber grommets on the backside and (DVI’s) on this card. The internal SLI cable has most likely detached from the card, so go ahead and realign it with the two connectors on the card. Now place the heat sink onto the card. This can only work one way, the side that has the mini copper block section must be facing up.

Photobucket

Step 14. Once the heat sink has been placed over top flip the heat sink/GPU over and begin to screw in the screw's you put aside. Make sure everything is tight and in place.

Photobucket

Step 15. Once the card with the DVI connections is screwed into the heat sink, go ahead and get your top card and place it over top. Make sure you re-attach the sli cable to this card. You can now start to screw in the designated screws you set aside for this card. Make sure everything is tight and all screws are in.

Almost done.

Step 16. You will need to re bend the exhaust shield from the top GPU over the DVI connectors of the bottom GPU. Bend it firmly over and re screw the two sided mounting screws to both sides of the DVI connectors.

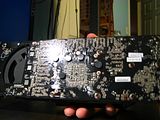
Step 17. Take the graphics card shroud cover, place it back onto the bottom of the GTX 295, slide it up and it will now be back into place. Screw in the three screws in the back side, the one on the front left side, and the two behind the GTX 295 sticker. Now, get some double sided tape or glue if you wish the replace the BFG GTX 295 sticker (doesn’t apply to EVGA)

And your done. Go ahead and reinstall it back into your system, power up and check the temperatures. I noticed a 4-5C temperature decrease under load and a 1-2C decrease idle.